Monday, December 23, 2013

What is Flash Fills in Excel 2013? How to turn it on?


Sometime we have to fill lot of repetitive data in excel and that becomes very cumbersome. During such cases Flash Fills newly included in MS Excel 2013 helps and saves a lot of time and effort. There are two different options available to reduce time and effort by avoiding repetitive tasks. 1) Auto Fill and 2) Flash Fill.

Auto Fill: Instead of entering data manually on a worksheet, you can use the Auto Fill feature to fill cells with data that follows a pattern or that is based on data in other cells.

Flash Fill: Use Flash Fill, new in Excel 2013, to fill out data based on an example. Flash Fill typically starts working when it recognizes a pattern in your data, and works best when your data has some consistency.

How to turn on Flash Fills?

Flash Fill is On by default. However if it is not working then visit File => Option and then click Advanced. You will get the option of Flash Fill as shown below.

Check the box and save. For more information on how to do this, please get in touch with me at Samrat.biswaas@gmail.com

Friends, Now Excel in MS Excel is available in Facebook as well. You can quickly raise your MS Excel related queries in its platform. I will try to resolve them. And finally Merry Christmas to All.


Visit Other MS Excel Tips and Tricks
How to avoid #DIV/0! and #Value! Error?
How to create One Variable Data Table using What-if-Analysis?

Samrat Biswas, Six Sigma (Green Belt), MOS Excel Expert 2013, ITIL 2011 Foundation
Advanced MS Office (Excel, Word, PowerPoint, One Note, Outlook), and MS Visio
--------------------------------------------------------------------------------------------------------------------
Be a part of regular Weekend Knowledge Sharing Sessions
Reach me @ +91 8095039316/ +91 8095039315
https://www.facebook.com/Samrat.Biswas

Monday, December 16, 2013

How to create Custom Dates?

While I was appearing the MOS exam for Excel expert, I got a question of changing the date format to only year i.e., YYYY. Do you know how to do this?

If you go to the Format Cell option and then Date; you will not get this option of changing your date to YYYY.

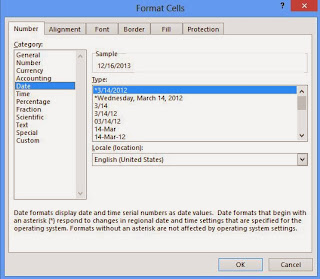
To convert this into the desired format, first you have to select the cell where you have the date (MM-DD-YYYY) and then click Format Cell Option either by doing right click or by Number Format settings. Refer as shown below.


Click Date in the Number tab. You will get all the different date formats in Type:. Check thoroughly, you will not get the date format of YYYY.

For this, after clicking date you have to click "Custom" as shown beside. And here you go with the option of editing the date in the Type: cell. Select the format and update it to YYYY.

For more information on how to do this, please get in touch with me at Samrat.biswaas@gmail.com

Friends, Now Excel in MS Excel is available in Facebook as well. You can quickly raise your MS Excel related queries in its platform. I will try to resolve them.

Visit Other MS Excel Tips and Tricks
How to protect your workbook and prevent unauthorized access with a password?
Know more on HOME Ribbon!!

Discussions on LinkedIn.
http://www.linkedin.com/groupAnswers?viewQuestionAndAnswers=&discussionID=5818291548428713984&gid=44008&commentID=5819332919608512512&trk=view_disc&fromEmail=&ut=17jI2SoaCMS601

http://www.linkedin.com/groupAnswers?viewQuestionAndAnswers=&discussionID=5818291549154332673&gid=1838429&commentID=5819278410286915584&trk=view_disc&fromEmail=&ut=2BT0iQEH2NS601

Samrat Biswas, Six Sigma (Green Belt), MOS Excel Expert 2013, ITIL 2011 Foundation
Advanced MS Office (Excel, Word, PowerPoint, One Note, Outlook), and MS Visio
--------------------------------------------------------------------------------------------------------------------
Be a part of regular Weekend Knowledge Sharing Sessions
Reach me @ +91 8095039316/ +91 8095039315
https://www.facebook.com/Samrat.Biswas
Thursday, December 5, 2013

How to protect your workbook and prevent unauthorized access with a password?

In one of my previous post, I had shared with you all regarding protection of your workbook structure from un-authorized users. I have provided two different options to do this.

Today in this post, I will share with you on protecting your entire workbook from un-authorized access from any user with whom you don't want to share your spreadsheet data.

In MS Excel, there are two different ways of protecting your entire workbook. A) You can visit the "Protect Workbook" option and encrypt your spreadsheet with a password. B) Or you can visit the "Save As" option and protect your sheet.

A) Click the File tab and then click the "Protect Workbook" option as shown below. Put your password and click Ok. This will ask you to re-enter your password and that's it. Your file is protected with your given password. Keep it in mind that if you forget this password then it is somewhat impossible to retrieve it.

B) From this "Save As" option you cannot only protect the entire sheet but you can provide two different levels of protection in it. a) You can give a password to open the file b) You can give a separate file to modify the data.

This option helps you in the following case: You want to share the data with someone, but simultaneously you don't want the same user to modify the data. By the help of this level of protection you can restrict the user to only view the spreadsheet content.

For more information on how to do this, please get in touch with me at Samrat.biswaas@gmail.com

Samrat Biswas, MOS Excel Expert 2013, ITIL V3 Foundation
Advanced MS Office (Excel, Word, PowerPoint, One Note, Outlook), and MS Visio
--------------------------------------------------------------------------------------------------------------------
Be a part of regular Weekend Knowledge Sharing Sessions
Reach me @ +91 8095039316/ +91 8095039315

Monday, December 2, 2013

Know more on HOME Ribbon!!

The Ribbon is designed to help you quickly find the commands that you need to complete a task. Commands are organized in logical groups, which are collected together under tabs. Each tab relates to a type of activity, such as writing or laying out a page.
 
To reduce clutter, some tabs are shown only when needed. For example, the Picture Tools tab is shown only when a picture is selected. Source: Microsoft Office Tutorial.

About Home Ribbon


Ribbons are the list of different tools available in any Microsoft products. We generally see this in top of the application interface. By default there are seven (7) ribbons available in MS Excel. Such as Home, Insert, Pagelayout, Formulas, Data, Review and View. Other than these default ribbons, user can also load Developer ribbon in this list. As these ribbons contains all the tools required to work in MS Excel so these are must learning.
 
Let’s see the different tools and features available in the first ribbon, Home.
 
The first tools which we see in Home ribbon is the Clipboard. The use of clipboard is for copying, cutting, format painter and pasting the content as per your own wish.
 
The second tool is Font. By the help of this you can change the font type and size, make it bold and italics, assign color to your sentences, change the color of the font and can arrange and assign different border types to your data table.
 
The third tool in Home ribbon is Alignment. Alignment tools help the user to align the text as per his/ her wish. This also provide the option of changing the Indent of any text. It has the option called Wrap text. This features allows the user to fit-in a length sentence in a column of smaller width. This tool also contains the option of merging two or more cells and further align them as per your need.
For more details on the Home Ribbon and other ribbons please get in touch with me at Samrat.biswaas@gmail.com

Samrat Biswas, MOS Excel Expert 2013, ITIL V3 Foundation
Advanced MS Office (Excel, Word, PowerPoint, One Note, Outlook), and MS Visio
--------------------------------------------------------------------------------------------------------------------
Be a part of regular Weekend Knowledge Sharing Sessions
Reach me @ +91 8095039316/ +91 8095039315

Preface 2nd Edition

The Kindle edition of this book was liked by many individuals. There are multiple different messages and post on Facebook or in Excel in MS ...