Sunday, September 6, 2020

Preface 2nd Edition

The Kindle edition of this book was liked by many individuals. There are multiple different messages and post on Facebook or in Excel in MS Excel blog for another edition of this book with more focus on additional formulas and functions.

Microsoft Excel has more than 300+ formulas included in the 2016 version. However, a few handfuls of them are extremely useful for the readers of this book. I focused only on those formulas which are of frequent use in any form of work.

Hope you all will like reading the new revised edition with more formulas and updated snapshots.

Happy Reading!!

Tuesday, May 5, 2020

Excel in MS Excel - For Freshers and Professional By Samrat Biswas

This book is aimed for professionals working in any domain where knowledge of MS Excel is of utmost importance. Be it a fresher with MBA and a full time professionals working in any roles; this book will help them understand the different MS Excel features required in day to day operations.

This book will deal on the basic concepts of MS Excel which an individual need to know before implementing them in their official activities. I have written this book not as a traditional text book where you only see the explanation of the individual topics. But tried to bring different scenarios we face in our daily office work to correlate the office requirement and MS Excel knowledge. You can find many unique topics such as Trendline, Sparklines, Trace Precedents, Trace Antecedents, Slicers and Timelines are covered in this book.

This is not a typical text book for training MS Excel. This book is written keeping different scenarios in mind of the user. Some key questions which a novice or sometime an experienced person also get in his mind such as-

What Excel feature are to be used in a given situation? How to achieve a certain outcome based on your data availability? How to get your data entered by people so that it can be later easy to analyse the data are addressed with detail explanation.

Practice exercises are also given at the end of all chapters. This book is available in both printed form and Kindle edition. Kindle edition is very handy if one has Kindle monthly subscription.


Friday, January 4, 2019

Advance MS Excel 2013 Course Content

Day 1 (Saturday - 4 Hours)

Protecting and Sharing

  • Sharing a file
  • Tracking changes
  • Accepting or rejecting changes
  • Applying Data validation rules
  • Inserting comments
  • Protecting cells, sheets, files
  • Password protecting a file
  • Password protecting a cell range

Conditional Formatting/Data Validation

  • Update Workbook Properties
  • Apply Conditional Formatting
  • Add Data Validation Criteria

Functions

  • If Statements
  • Nested If
  • And
  • Or
  • Not
  • Combining If, And, Or, Not
  • Sumif
  • Countif
  • Horizontal Lookup (Hlookup)
  • Vertical Lookup (Vlookup)

Auditing Worksheets

  • Trace Cells
  • Troubleshoot Invalid Data and Formula Errors
  • Watch and Evaluate Formulas
  • Create a Data List Outline

Lookup and Information Functions

  • Match function
  • Index Function
  • IFERROR
  • Vlookup, Hlookup
  • Database Functions: Dsum, Dmin, Dmax, Daverage, Dcount

Day 2 (Sunday - 4 Hours)

Summarizing Data with Pivot Tables

  • Inserting calculated fields
  • Manipulating Fields
  • Changing Value Field Settings
  • Using Report Filter
  • Grouping Data containing Dates and Numbers
  • Formatting Pivot Table
  • Showing and Hiding the Grand Totals
  • Refreshing Data In Pivot Table
  • Changing The Scope Of The Data source
  • Summarizing Values by Sum, Count, Average, Max, and Product
  • Show Values As % of Grand Total, % of Column Total, % of Row Total
  • Pivot Table Options
  • Using Slicers for Effective Filtering
  • Pivot Chart

General Analysis Tools

  • Scenarios
  • Custom Views

Introduction to Macros

  • Displaying the Developer Tab
  • Review And Purpose Of Macros
  • Where To Save Macros
  • Absolute and relative record
  • Running macros: Assigning to Quick Access Toolbar, 
  • shapes, Pictures and keyboard shortcuts

Analyzing Data

  • Create a Trendline
  • Create Scenarios
  • Perform a What-if Analysis
  • Perform a Statistical Analysis with the Analysis ToolPak 

Importing and Exporting Data

  • Export Excel Data
  • Import a Delimited Text File


Monday, December 31, 2018

Wednesday, October 10, 2018

Advance MS Excel 2 Days course

Booking Open for Batch 4 - 3rd and 4th November 2018

There are only 25 seats available per batch...

Thanks for showing all your interest in the Excel in MS Excel Blog. Although I was out from blogging for few months but now I am back with Online MS Excel 2013 training. Join the best online training to learn MS Excel Nuances...

MS Excel Course Fee

Advance MS Excel 2013 
Duration: 14 hours (2 days)
Training Mode: Online
Fees: INR 1999/- and USD 69 


Course Contents (Click the link below for details)


Course Materials

  1. Soft copy course materials will be provided to all participants
  2. Excel in MS Excel E Book Amazon coupons will be provided to all participants. 
Excel in MS Excel - Visit Amazon for more details

Training Dates

Weekends (Saturday and Sunday)

Booking Open for Batch 4 - 3rd and 4th November 2018 - Hurry Block Your Seat!!!

Course Enrollment

For course enrollment please send the following information in the given email ID.
samrat.biswaas@gmail.com along with the payment confirmation/reference number and amount paid.

Subject: Advance MS Excel 2013| Training Date

Name:
Email ID:
Phone No:
Organization:
Experience in Excel: Foundation/Intermediate?
Preferred Date of Training: (Any weekends)
Any specific features in Excel you are interested in:
Amount Paid:
Payment confirmation Reference Number:


System Requirement

Laptop/Desktop
MS Excel 2013 
Broadband Connection for good internet speed


Payment Mode (NEFT/IMPS)

Samrat Biswas/Excel in MS Excel
Bank: Yes Bank Ltd
Bank Address: 26th Main Road, 9th Block, Bangalore 560011
Account Number: 065390100000612
IFSC Code: YESB0000653


Contact Details

Mobile: +91 8095039316

Terms and Conditions

  1. Training will be provided Online. 
  2. Course fee payment to be done in advance to block the seat
  3. Within 24 hours of realizing the payment seat blocking confirmation along with Online training link will be provided to all participants.
  4. Course materials and Amazon ebook coupon will be provided on the first day of training.
  5. In case the trainer is not able to impart the training on the scheduled days for any technical reason and if candidate do not want to participate in the next available dates then the course fees will be refunded with necessary deduction of the ebook and course material cost.


Wednesday, October 4, 2017

Advance MS Excel Online Training Course

Booking Open for Batch 3 - 29th and 30th December 2017 

Hurry Block Your Seat!!! Offering Rs. 1000/- Year-end discount.

There are only 25 seats available per batch...

Thanks for showing all your interest in the Excel in MS Excel Blog. Although I was out from blogging for few months but now I am back with Online MS Excel 2013 training. Join the best online training to learn MS Excel Nuances...

MS Excel Course Fee

Advance MS Excel 2013 
Duration: 14 hours (2 days)
Training Mode: Online
Fees: INR 1999/- and USD 69 


Course Contents (Click the link below for details)


Course Materials

  1. Soft copy course materials will be provided to all participants
  2. Excel in MS Excel E Book Amazon coupons will be provided to all participants. 
Excel in MS Excel - Visit Amazon for more details

Training Dates

Weekends (Saturday and Sunday)

Booking Open for Batch 3 - 29th and 30th December 2017 - Hurry Block Your Seat!!!

Course Enrollment

For course enrollment please send the following information in the given email ID.
samrat.biswaas@gmail.com along with the payment confirmation/reference number and amount paid.

Subject: Advance MS Excel 2013| Training Date

Name:
Email ID:
Phone No:
Organization:
Experience in Excel: Foundation/Intermediate?
Preferred Date of Training: (Any weekends)
Any specific features in Excel you are interested in:
Amount Paid:
Payment confirmation Reference Number:


System Requirement

Laptop/Desktop
MS Excel 2013 
Broadband Connection for good internet speed


Payment Mode (NEFT/IMPS)

Samrat Biswas/Excel in MS Excel
Bank: Yes Bank Ltd
Bank Address: 26th Main Road, 9th Block, Bangalore 560011
Account Number: 065390100000612
IFSC Code: YESB0000653


Contact Details

Mobile: +91 8095039316

Terms and Conditions

  1. Training will be provided Online. 
  2. Course fee payment to be done in advance to block the seat
  3. Within 24 hours of realizing the payment seat blocking confirmation along with Online training link will be provided to all participants.
  4. Course materials and Amazon ebook coupon will be provided on the first day of training.
  5. In case the trainer is not able to impart the training on the scheduled days for any technical reason and if candidate do not want to participate in the next available dates then the course fees will be refunded with necessary deduction of the ebook and course material cost.


Saturday, March 26, 2016

Know Data Validation in MS Excel

Conversation between Manager and Executive
Executive: Team members are filling data in irregular formatting
Manager: So you must have tough time create the report
Executive: Yes L
Manager: So why don’t you use Data Validation to restrict your user for filling irregular data. Read the section below to know more on this…


Data validation in Excel helps you to restrict others to enter the value in the way you want them to enter. For example, you want that the user should only fill value from 1 to 100. If the user fills a value more than 100 then Data validation will restrict the user to fill the same. Simultaneously you can restrict user to update date as per the format you have decided. You can even allow “custom” in the data validation option by including some kind of formulas in it.

Youtube Video Teaching - Data Validation List


For more details you can buy my ebook available in Amazon
Only @ Rs.139/-

Visit Other MS Excel Tips and Tricks

Samrat Biswas, Six Sigma (Green Belt), MOS Excel Expert 2013, ITIL 2011 Foundation
Advanced MS Office (Excel, Word, PowerPoint, One Note, Outlook), and MS Visio
-----------------------------------------------------------
Be a part of regular Weekend Knowledge Sharing Sessions
Reach me @ +91 8095039316
https://www.facebook.com/Samrat.Biswas

Sunday, November 1, 2015

Excel in MS Excel - For Freshers and Experienced Professionals| eBook is now available for SALE in Amazon

Buy Now 


This book is aimed for professionals working in any domain where knowledge of MS Excel is of utmost importance. Be it a fresher  or a full time professionals working in any roles; this book will help them understand the different MS Excel features required in day to day operations. This book will deal on the basic concepts of MS Excel which an individual need to know before implementing them in their official activities. I have written this book not as a traditional text book where you only see the explanation of the individual topics. But tried to bring different scenarios we face in our daily office work to correlate the office requirement and MS Excel knowledge. You can find many unique topics such as Trendline, Spaklines, Trace Precedents, Trace Antecedents, Slicers Timelines and many more are covered in this book. I have included practice exercises at the end of each topics. This will help readers to judge their gathered knowledge. I will also be sharing Practice Sheet along with the book. Where you will see all live examples and re-use them in your office work.


I hope that this eBook will definitely help you improve your performance in MS Excel usage. 

India| http://www.amazon.in/gp/product/B016YYJS9E?*Version*=1&*entries*=0
USA| http://www.amazon.com/gp/product/B016YYJS9E?*Version*=1&*entries*=0

Friday, October 30, 2015

What is Signature Line in MS Excel?


A signature line is similar to any signature placeholder we see in a printed document. This options helps the user to put a place holder for a signature, suggested signer, his title and email address. The idea to use this is for considering the document as 'reviewed' and 'approved'. Once the signature is done the document turns into a non editable document.


How to add a Signature Line in MS Excel?

For this, user has to go to the Insert ribbon of MS Excel. There you find a tool called 'Text'. This has an option called 'Add a Signature Line'. Upon clicking this option, a 'Signature Setup' dialog box pops out. In this user has to enter suggested signer, his title and email address. You can also enter a comments for the proposed signer as shown below.


After completing the entries when you click ok you will find a signature line embedded in your Excel spreadsheet. You can move, cut and paste it anywhere in your document as per your need.


If you double click the signature line you will be prompted with a dialog box of 'Sign'. There you will have an option of selecting the signature image which will get embedded in your document. This will also show the signing date and other details of the signing authority. Once done your document is signed and become non editable for others unless anyone forcefully removes the signature and does some changes. Make sure you review the document before signing it...otherwise the onus of any mistake in the document content will be on you :-)


For more details you can reach me...

Visit Other MS Excel Tips and Tricks

How to load Add In Tools?

Samrat Biswas, Six Sigma (Green Belt), MOS Excel Expert 2013, ITIL 2011 Foundation
Advanced MS Office (Excel, Word, PowerPoint, One Note, Outlook), and MS Visio
-----------------------------------------------------------
Be a part of regular Weekend Knowledge Sharing Sessions
Reach me @ +49 15211442120
https://www.facebook.com/Samrat.Biswas

Saturday, August 15, 2015

How to load Add-Ins Tool in Excel 2013?

How to load Add-Ins Tool in Excel 2013?

Add-Ins tool comprises four different tool packs. For example:

  1. Analysis ToolPak - Provides data analysis tools for statistical and engineering analysis
  2. Analysis ToolPak - VBA - VBA functions for Analysis ToolPak
  3. Euro Currency Tools - Conversion and formatting of Euro currency
  4. Solver Add-in - Tools for optimizing and equation solving

But before we go and load the above tools you first need to have the "Developers" ribbon in place. If you do not know how to get the "Developers" ribbon then please follow the below blog.


Once the Developer ribbon is loaded click the Add-ins option available under tool Add-ins. This will provide you a pop up tool kit having list of all the above four tools. To load any of them you have to click the check box and hit ok. And there you go...

Users having interest in statistical tools and its usage can try and use the Analysis ToolPak option. This is really a wonderful tool. It provides you enormous amount of calculations in seconds; provided you have to give the right inputs.

For more details you can reach me...

Visit Other MS Excel Tips and Tricks
Use of Advance Filter in MS Excel

Samrat Biswas, Six Sigma (Green Belt), MOS Excel Expert 2013, ITIL 2011 Foundation
Advanced MS Office (Excel, Word, PowerPoint, One Note, Outlook), and MS Visio
---------------------------------------------------------------------------
Be a part of regular Weekend Knowledge Sharing Sessions
Reach me @ +91 8095039316
https://www.facebook.com/Samrat.Biswas

Saturday, June 20, 2015

Use of Advance Filter in MS Excel

Advance filter available in "Data" ribbon is used to filter your data with some complex criteria. To use advance filter option you have to create a criteria for your filter. The criteria table should have the same set of headings with respect to your data list. Scenario - We would like to filter Quarter 1 sales from state Karnataka in the below given data set.

Step 1: Have your data set ready


Step 2: Create your criteria

Step 3: Go to "Data" Ribbon and click "Advance Filter" option. This will pop out the following dialog box. You will get an option called Action. Select "Copy to another location" radio button then select the data set range from which you want to filter your criteria and then select the criteria which you would like to filter. Once this is done locate the place in the same sheet or any other sheet where you want to have the output. Hit OK and there you go you will get the desired result.

For more information on how to do this, please get in touch with me at Samrat.Biswas@ hotmail.com or Samrat.biswaas@gmail.com

Friends, Now Excel in MS Excel is available in Facebook as well. You can quickly raise your MS Excel related queries in its platform. I will try to resolve them.

Visit Other MS Excel Tips and Tricks
Usage of Document Inspector

Samrat Biswas, Six Sigma (Green Belt), MOS Excel Expert 2013, ITIL 2011 Foundation
Advanced MS Office (Excel, Word, PowerPoint, One Note, Outlook), and MS Visio
---------------------------------------------------------------------------------------------------------
Be a part of regular Weekend Knowledge Sharing Sessions
Reach me @ +91 8095039316
https://www.facebook.com/Samrat.Biswas

Wednesday, April 22, 2015

Usage of Inspect Document

Hello Friends, After almost 2 months I have got time from my normal bid management work to share something new on Excel with you. But before that I would like to say thanks to all my blog reader for visiting my posts regularly. I would also like to thank to all the viewers in my Facebook page.

Let's come back to the point- Many a times it might have happened to all that after sending report to your manager it bounces back - saying this has been copied from some old customer reports. Isn't it? Because we tend to work on an existing file always. We tweak them and make them as per the current requirements but forget to change/update the file properties.

In MS Excel, we have an option called "Inspect Document". This helps user to check the workbook for hidden properties and personal information.

For this you have to go to the FILE Ribbon and click "Check for Issues". This will have the option "Inspect Document". Upon clicking this you will get "Document Inspector" dialog box. Here you have to continue by clicking the "Inspect" button. Thereby you will see all the hidden properties. You may like retain them or Excel will provide an option of Removing them all.

Hope this helps.

For more information on how to do this, please get in touch with me at Samrat.Biswas@ hotmail.com or Samrat.biswaas@gmail.com

Friends, Now Excel in MS Excel is available in Facebook as well. You can quickly raise your MS Excel related queries in its platform. I will try to resolve them.

Visit Other MS Excel Tips and Tricks
How to create drop down menu in MS Excel?

Samrat Biswas, Six Sigma (Green Belt), MOS Excel Expert 2013, ITIL 2011 Foundation
Advanced MS Office (Excel, Word, PowerPoint, One Note, Outlook), and MS Visio
---------------------------------------------------------------------------------------------------------
Be a part of regular Weekend Knowledge Sharing Sessions
Reach me @ +91 8095039316/ +91 8095039315
https://www.facebook.com/Samrat.Biswas


Sunday, February 22, 2015

How to remove duplicates from a column of data?

A quick tips for today

To remove duplicates from a column of data you can use the conditional formatting. First you have to use conditional formatting to identify the duplicates and then delete the highlighted duplicates by deleting the rows.

For more information on how to do this, please get in touch with me at Samrat.biswaas@gmail.com

Friends, Now Excel in MS Excel is available in Facebook as well. You can quickly raise your MS Excel related queries in its platform. I will try to resolve them.

Visit Other MS Excel Tips and Tricks
How to recommend a good chart to showcase your data?

Samrat Biswas, Six Sigma (Green Belt), MOS Excel Expert 2013, ITIL 2011 Foundation
Advanced MS Office (Excel, Word, PowerPoint, One Note, Outlook), and MS Visio
---------------------------------------------------------------------------------------------------------
Be a part of regular Weekend Knowledge Sharing Sessions
Reach me @ +91 8095039316/ +91 8095039315
https://www.facebook.com/Samrat.Biswas

Sunday, January 25, 2015

You know Excel recommends good charts to showcase your data!!


Friends, you must be knowing how to insert a chart from your available data. But sometime it happens that you are not able to select which chart will look good.  You know Excel itself recommends good charts to showcase your data. You may like to use them by following the below given steps.

Step 1: Select your data which you want to represent through charts
Step 2: Visit "Insert" Ribbon and click "Recommended Charts" option, as show below.
Step 3: This will lead you the pop up of "Recommended Charts". Select the chart type which you like and click OK. and here you go....you new recommended chart is created.

For more information on how to do this, please get in touch with me at Samrat.biswaas@gmail.com  

Friends, Now Excel in MS Excel is available in Facebook as well. You can quickly raise your MS Excel related queries in its platform. I will try to resolve them.

Visit Other MS Excel Tips and Tricks

Samrat Biswas, Six Sigma (Green Belt), MOS Excel Expert 2013, ITIL 2011 Foundation
Advanced MS Office (Excel, Word, PowerPoint, One Note, Outlook), and MS Visio
---------------------------------------------------------------------------------------------------------
Be a part of regular Weekend Knowledge Sharing Sessions
Reach me @ +91 8095039316/ +91 8095039315
https://www.facebook.com/Samrat.Biswas

Monday, December 22, 2014

What is Scenario Manager?


Do you know you can use Excel Scenarios to store several versions of data in a worksheet. Then, print scenarios separately, or compare side-by-side.

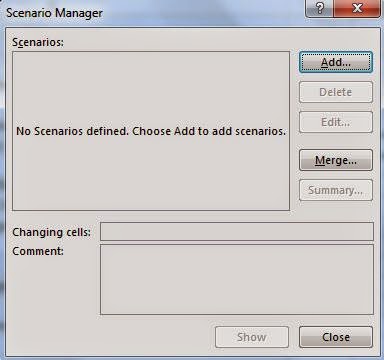
On the DATA menu, click “What-if-Analysis”. Then click “Scenario Manager”. Post that you get the Scenario Manager Dialog box.


  1. In the Scenario name box, type a name for the scenario.
  2. In the Changing cells box, enter the references for the cells that you want to change. (Note: To preserve the original values for the changing cells, create a scenario that uses the original cell values before you create scenarios that change the values.)
  3. Under Protection, select the options you want. Click OK.
  4. In the Scenario Values dialog box, type the values you want for the changing cells.
  5. To create the scenario, click OK.
  6. If you want to create additional scenarios, click Add again, and then repeat the procedure. When you finish creating scenarios, click OK, and then click Close in the Scenario Manager Dialog box.
For more information on how to do this, please get in touch with me at Samrat.biswaas@gmail.com 

Friends, Now Excel in MS Excel is available in Facebook as well. You can quickly raise your MS Excel related queries in its platform. I will try to resolve them.

Visit Other MS Excel Tips and Tricks

Samrat Biswas, Six Sigma (Green Belt), MOS Excel Expert 2013, ITIL 2011 Foundation
Advanced MS Office (Excel, Word, PowerPoint, One Note, Outlook), and MS Visio
---------------------------------------------------------------------------------------------------------
Be a part of regular Weekend Knowledge Sharing Sessions
Reach me @ +91 8095039316/ +91 8095039315
https://www.facebook.com/Samrat.Biswas

Monday, October 13, 2014

How to create drop down menu in MS Excel?

Hi All, The central and state governments were well prepared for the yesterday's cyclone Hudhud. And by God's grace we had very little casualties in comparison to last years Phailin. RIP for those who couldn't make it.

I was completely out of "Excel in MS Excel" and was fully occupied from last 6 months on my office work. This really paid me high on satisfaction. I have won two deals this financial year. Still two more to come. Finger crossed though!!!

Have got some time again to write for you all. I would like to share with you that in Excel we can create a drop down menu by using the "Data Validation" tools available under the Data ribbon.

Step 1: Create the list of items which you would like to put in the "Drop Down" list.

Step 2: Click "Data Validation" in the Data Ribbon and then select "List" from the drop down. This will pop out a "Data Validation" dialog box. In this you have to locate the list of items in the Source cell which you would like to bring in the drop down menu.
And that's it!! You have drop down menu in the selected cell. Now which ever item from the list you want you can select.

This feature helps you a lot when you want to choose an item from different options. If you allow users to populate the same, there may not be any uniqueness on that. And further it will be difficult for you to apply selections etc.


For more information on how to do this, please get in touch with me at Samrat.biswaas@gmail.com 

Friends, Now Excel in MS Excel is available in Facebook as well. You can quickly raise your MS Excel related queries in its platform. I will try to resolve them.

Visit Other MS Excel Tips and Tricks

Samrat Biswas, Six Sigma (Green Belt), MOS Excel Expert 2013, ITIL 2011 Foundation
Advanced MS Office (Excel, Word, PowerPoint, One Note, Outlook), and MS Visio
---------------------------------------------------------------------------------------------------------
Be a part of regular Weekend Knowledge Sharing Sessions
Reach me @ +91 8095039316/ +91 8095039315

Wednesday, April 16, 2014

How to create workspace in MS Excel and its benefits?

cómo crear un espacio de trabajo en MS Excel y sus beneficios?

Let’s consider that in your day to day activities on reporting you need to open multiple excel spreadsheets available in different locations to compile data at one report file. So every day while starting, you need to take the pain of opening these files from different location and then start your work.

To avoid the repetition of opening multiple files from multiple location; you can create a workspace file (*.xlw) and save it at a known location. So every day when you open this file you will get all your desired files opened at one place and at the same position where you want them to be available for your report creation.

To create the workspace file you need to open all your files and keep them in the way you want to get this open every day. Go to the View tab. There you click “Save Workspace” option. This will provide you the dialog box of saving the *.xlw file at your desired location.

Post that whenever you want to open these files together you can directly click the *.xlw file and this will allow you to get all the spreadsheets which you want to open to accomplish your work.

For more information on how to do this, please get in touch with me at Samrat.biswaas@gmail.com.

Friends, Now Excel in MS Excel is available in Facebook as well. You can quickly raise your MS Excel related queries in its platform. I will try to resolve them.

Visit Other MS Excel Tips and Tricks


Samrat Biswas, Six Sigma (Green Belt), MOS Excel Expert 2013, ITIL 2011 Foundation
Advanced MS Office (Excel, Word, PowerPoint, One Note, Outlook), and MS Visio
---------------------------------------------------------------------------------------------------------
Be a part of regular Weekend Knowledge Sharing Sessions
Reach me @ +91 8095039316/ +91 8095039315
https://www.facebook.com/Samrat.Biswas

Monday, March 24, 2014

How to insert Calendar Control in MS Excel?

Cómo insertar Control Calendar en MS Excel?
Spanish Version of this blog

To insert the calendar control you first have to enable your "Developer" tab. For this click "Excel Option" and check the "Show Developer tab in the Ribbon" option.

Step 1: Go to the "Developer Tab" and click "Insert" control drop down. There you will get "Form Controls" and "ActiveX Controls"

Step 2: In the ActiveX Controls, click the more control option. By doing this you will get the following dialog box.
Step 3: Select "Calendar Control 12.0" and click OK.

Step 4: Drag your cursor on the spreadsheet where you want to keep the calendar. You will get the calendar control as shown below.

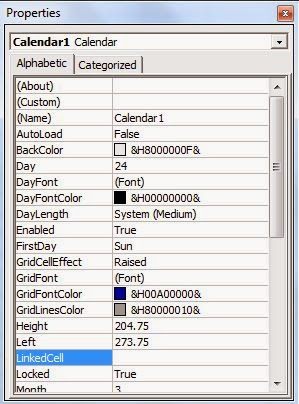
Step 5: Select the Calendar and click right. Select the "Properties" option and go to the "LinkedCell" and type the cell number where you want to display the selected date from your calendar.


And there you go..your Calendar Control is successfully inserted. Now you can pick any date from the shown calendar and your date will be visible in the particular cell.

For more information on how to do this, please get in touch with me at Samrat.biswaas@gmail.com.

Friends, Now Excel in MS Excel is available in Facebook as well. You can quickly raise your MS Excel related queries in its platform. I will try to resolve them.

Visit Other MS Excel Tips and Tricks
How to recover unsaved files in MS Excel 2013?
What are Sparklines in MS Excel?

Samrat Biswas, Six Sigma (Green Belt), MOS Excel Expert 2013, ITIL 2011 Foundation
Advanced MS Office (Excel, Word, PowerPoint, One Note, Outlook), and MS Visio 
---------------------------------------------------------------------------------------------------------
Be a part of regular Weekend Knowledge Sharing Sessions
Reach me @ +91 8095039316/ +91 8095039315
https://www.facebook.com/Samrat.Biswas

Sunday, March 16, 2014

How to move texts from Notepad to Column in MS Excel?

This is also known as "Import a Delimited Text File".

Step 1: To import a Delimited Text File, the user has to go to the “DATA” ribbon. In this there is a tool named “Get External Data”. By the help of this tool user can import data from Access, Web or from Text files. The text file has to be delimited.
MS Excel 2013 - Data Ribbon
Step 2: Click “From Text” Option. An Import Text File dialog box will pop in. Locate the delimited file you want to import in excel. Click “Import”.

Post clicking “Import”, you will get a “Text Import Wizard”. It has 3 steps involved in it. Check My Data as headers and click Next.

Click the Delimiters available in your file. In the shown example it is “Tab” delimiter. Then click Next. This will lead to you Step 2 of 3.
Now you have to identify if the data available in the text file is differentiated by Tab or Semicolon or Comma, Space or Others. Pick the right option and click Next. This will lead to you Step 3 of 3.
Step 2 of this Import Wizard provides you option to select each column and set the Data Format. It has and Advanced option as well to convert numeric values to numbers etc. Once done click Finish.

This will lead to another pop up dialog box of "Import Data". This option allows user to view the data in following format:-
  1. Table
  2. Pivot Table Report
  3. Pivot Chart etc.
It also asks where do you want to put the data say which Cell on the existing worksheet or New Worksheet. Locate the cell from where you want the data to come in. Your available data in Delimited Text file will get imported in excel.

For more information on how to do this, please get in touch with me at Samrat.biswaas@gmail.com

Friends, Now Excel in MS Excel is available in Facebook as well. You can quickly raise your MS Excel related queries in its platform. I will try to resolve them.

Visit Other MS Excel Tips and Tricks
How to avoid #DIV/0! and #Value! Error?
How to create One Variable Data Table using What-if-Analysis?


Samrat Biswas, Six Sigma (Green Belt), MOS Excel Expert 2013, ITIL 2011 Foundation
Advanced MS Office (Excel, Word, PowerPoint, One Note, Outlook), and MS Visio 
---------------------------------------------------------------------------------------------------------
Be a part of regular Weekend Knowledge Sharing Sessions
Reach me @ +91 8095039316/ +91 8095039315
https://www.facebook.com/Samrat.Biswas

Preface 2nd Edition

The Kindle edition of this book was liked by many individuals. There are multiple different messages and post on Facebook or in Excel in MS ...