Wednesday, April 22, 2015

Usage of Inspect Document

Hello Friends, After almost 2 months I have got time from my normal bid management work to share something new on Excel with you. But before that I would like to say thanks to all my blog reader for visiting my posts regularly. I would also like to thank to all the viewers in my Facebook page.

Let's come back to the point- Many a times it might have happened to all that after sending report to your manager it bounces back - saying this has been copied from some old customer reports. Isn't it? Because we tend to work on an existing file always. We tweak them and make them as per the current requirements but forget to change/update the file properties.

In MS Excel, we have an option called "Inspect Document". This helps user to check the workbook for hidden properties and personal information.

For this you have to go to the FILE Ribbon and click "Check for Issues". This will have the option "Inspect Document". Upon clicking this you will get "Document Inspector" dialog box. Here you have to continue by clicking the "Inspect" button. Thereby you will see all the hidden properties. You may like retain them or Excel will provide an option of Removing them all.

Hope this helps.

For more information on how to do this, please get in touch with me at Samrat.Biswas@ hotmail.com or Samrat.biswaas@gmail.com

Friends, Now Excel in MS Excel is available in Facebook as well. You can quickly raise your MS Excel related queries in its platform. I will try to resolve them.

Visit Other MS Excel Tips and Tricks
How to create drop down menu in MS Excel?

Samrat Biswas, Six Sigma (Green Belt), MOS Excel Expert 2013, ITIL 2011 Foundation
Advanced MS Office (Excel, Word, PowerPoint, One Note, Outlook), and MS Visio
---------------------------------------------------------------------------------------------------------
Be a part of regular Weekend Knowledge Sharing Sessions
Reach me @ +91 8095039316/ +91 8095039315
https://www.facebook.com/Samrat.Biswas


Sunday, February 22, 2015

How to remove duplicates from a column of data?

A quick tips for today

To remove duplicates from a column of data you can use the conditional formatting. First you have to use conditional formatting to identify the duplicates and then delete the highlighted duplicates by deleting the rows.

For more information on how to do this, please get in touch with me at Samrat.biswaas@gmail.com

Friends, Now Excel in MS Excel is available in Facebook as well. You can quickly raise your MS Excel related queries in its platform. I will try to resolve them.

Visit Other MS Excel Tips and Tricks
How to recommend a good chart to showcase your data?

Samrat Biswas, Six Sigma (Green Belt), MOS Excel Expert 2013, ITIL 2011 Foundation
Advanced MS Office (Excel, Word, PowerPoint, One Note, Outlook), and MS Visio
---------------------------------------------------------------------------------------------------------
Be a part of regular Weekend Knowledge Sharing Sessions
Reach me @ +91 8095039316/ +91 8095039315
https://www.facebook.com/Samrat.Biswas

Sunday, January 25, 2015

You know Excel recommends good charts to showcase your data!!


Friends, you must be knowing how to insert a chart from your available data. But sometime it happens that you are not able to select which chart will look good.  You know Excel itself recommends good charts to showcase your data. You may like to use them by following the below given steps.

Step 1: Select your data which you want to represent through charts
Step 2: Visit "Insert" Ribbon and click "Recommended Charts" option, as show below.
Step 3: This will lead you the pop up of "Recommended Charts". Select the chart type which you like and click OK. and here you go....you new recommended chart is created.

For more information on how to do this, please get in touch with me at Samrat.biswaas@gmail.com  

Friends, Now Excel in MS Excel is available in Facebook as well. You can quickly raise your MS Excel related queries in its platform. I will try to resolve them.

Visit Other MS Excel Tips and Tricks

Samrat Biswas, Six Sigma (Green Belt), MOS Excel Expert 2013, ITIL 2011 Foundation
Advanced MS Office (Excel, Word, PowerPoint, One Note, Outlook), and MS Visio
---------------------------------------------------------------------------------------------------------
Be a part of regular Weekend Knowledge Sharing Sessions
Reach me @ +91 8095039316/ +91 8095039315
https://www.facebook.com/Samrat.Biswas
Monday, December 22, 2014

What is Scenario Manager?


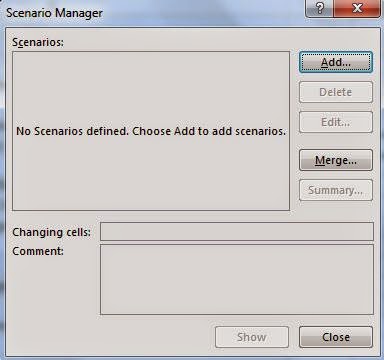
Do you know you can use Excel Scenarios to store several versions of data in a worksheet. Then, print scenarios separately, or compare side-by-side.

On the DATA menu, click “What-if-Analysis”. Then click “Scenario Manager”. Post that you get the Scenario Manager Dialog box.


  1. In the Scenario name box, type a name for the scenario.
  2. In the Changing cells box, enter the references for the cells that you want to change. (Note: To preserve the original values for the changing cells, create a scenario that uses the original cell values before you create scenarios that change the values.)
  3. Under Protection, select the options you want. Click OK.
  4. In the Scenario Values dialog box, type the values you want for the changing cells.
  5. To create the scenario, click OK.
  6. If you want to create additional scenarios, click Add again, and then repeat the procedure. When you finish creating scenarios, click OK, and then click Close in the Scenario Manager Dialog box.
For more information on how to do this, please get in touch with me at Samrat.biswaas@gmail.com 

Friends, Now Excel in MS Excel is available in Facebook as well. You can quickly raise your MS Excel related queries in its platform. I will try to resolve them.

Visit Other MS Excel Tips and Tricks

Samrat Biswas, Six Sigma (Green Belt), MOS Excel Expert 2013, ITIL 2011 Foundation
Advanced MS Office (Excel, Word, PowerPoint, One Note, Outlook), and MS Visio
---------------------------------------------------------------------------------------------------------
Be a part of regular Weekend Knowledge Sharing Sessions
Reach me @ +91 8095039316/ +91 8095039315
https://www.facebook.com/Samrat.Biswas

Monday, October 13, 2014

How to create drop down menu in MS Excel?

Hi All, The central and state governments were well prepared for the yesterday's cyclone Hudhud. And by God's grace we had very little casualties in comparison to last years Phailin. RIP for those who couldn't make it.

I was completely out of "Excel in MS Excel" and was fully occupied from last 6 months on my office work. This really paid me high on satisfaction. I have won two deals this financial year. Still two more to come. Finger crossed though!!!

Have got some time again to write for you all. I would like to share with you that in Excel we can create a drop down menu by using the "Data Validation" tools available under the Data ribbon.

Step 1: Create the list of items which you would like to put in the "Drop Down" list.

Step 2: Click "Data Validation" in the Data Ribbon and then select "List" from the drop down. This will pop out a "Data Validation" dialog box. In this you have to locate the list of items in the Source cell which you would like to bring in the drop down menu.
And that's it!! You have drop down menu in the selected cell. Now which ever item from the list you want you can select.

This feature helps you a lot when you want to choose an item from different options. If you allow users to populate the same, there may not be any uniqueness on that. And further it will be difficult for you to apply selections etc.


For more information on how to do this, please get in touch with me at Samrat.biswaas@gmail.com 

Friends, Now Excel in MS Excel is available in Facebook as well. You can quickly raise your MS Excel related queries in its platform. I will try to resolve them.

Visit Other MS Excel Tips and Tricks

Samrat Biswas, Six Sigma (Green Belt), MOS Excel Expert 2013, ITIL 2011 Foundation
Advanced MS Office (Excel, Word, PowerPoint, One Note, Outlook), and MS Visio
---------------------------------------------------------------------------------------------------------
Be a part of regular Weekend Knowledge Sharing Sessions
Reach me @ +91 8095039316/ +91 8095039315

Wednesday, April 16, 2014

How to create workspace in MS Excel and its benefits?

cómo crear un espacio de trabajo en MS Excel y sus beneficios?

Let’s consider that in your day to day activities on reporting you need to open multiple excel spreadsheets available in different locations to compile data at one report file. So every day while starting, you need to take the pain of opening these files from different location and then start your work.

To avoid the repetition of opening multiple files from multiple location; you can create a workspace file (*.xlw) and save it at a known location. So every day when you open this file you will get all your desired files opened at one place and at the same position where you want them to be available for your report creation.

To create the workspace file you need to open all your files and keep them in the way you want to get this open every day. Go to the View tab. There you click “Save Workspace” option. This will provide you the dialog box of saving the *.xlw file at your desired location.

Post that whenever you want to open these files together you can directly click the *.xlw file and this will allow you to get all the spreadsheets which you want to open to accomplish your work.

For more information on how to do this, please get in touch with me at Samrat.biswaas@gmail.com.

Friends, Now Excel in MS Excel is available in Facebook as well. You can quickly raise your MS Excel related queries in its platform. I will try to resolve them.

Visit Other MS Excel Tips and Tricks


Samrat Biswas, Six Sigma (Green Belt), MOS Excel Expert 2013, ITIL 2011 Foundation
Advanced MS Office (Excel, Word, PowerPoint, One Note, Outlook), and MS Visio
---------------------------------------------------------------------------------------------------------
Be a part of regular Weekend Knowledge Sharing Sessions
Reach me @ +91 8095039316/ +91 8095039315
https://www.facebook.com/Samrat.Biswas

Monday, March 24, 2014

How to insert Calendar Control in MS Excel?

Cómo insertar Control Calendar en MS Excel?
Spanish Version of this blog

To insert the calendar control you first have to enable your "Developer" tab. For this click "Excel Option" and check the "Show Developer tab in the Ribbon" option.

Step 1: Go to the "Developer Tab" and click "Insert" control drop down. There you will get "Form Controls" and "ActiveX Controls"

Step 2: In the ActiveX Controls, click the more control option. By doing this you will get the following dialog box.
Step 3: Select "Calendar Control 12.0" and click OK.

Step 4: Drag your cursor on the spreadsheet where you want to keep the calendar. You will get the calendar control as shown below.

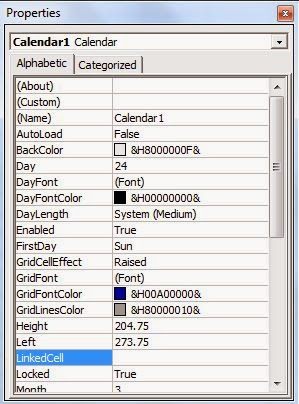
Step 5: Select the Calendar and click right. Select the "Properties" option and go to the "LinkedCell" and type the cell number where you want to display the selected date from your calendar.


And there you go..your Calendar Control is successfully inserted. Now you can pick any date from the shown calendar and your date will be visible in the particular cell.

For more information on how to do this, please get in touch with me at Samrat.biswaas@gmail.com.

Friends, Now Excel in MS Excel is available in Facebook as well. You can quickly raise your MS Excel related queries in its platform. I will try to resolve them.

Visit Other MS Excel Tips and Tricks
How to recover unsaved files in MS Excel 2013?
What are Sparklines in MS Excel?

Samrat Biswas, Six Sigma (Green Belt), MOS Excel Expert 2013, ITIL 2011 Foundation
Advanced MS Office (Excel, Word, PowerPoint, One Note, Outlook), and MS Visio 
---------------------------------------------------------------------------------------------------------
Be a part of regular Weekend Knowledge Sharing Sessions
Reach me @ +91 8095039316/ +91 8095039315
https://www.facebook.com/Samrat.Biswas

Preface 2nd Edition

The Kindle edition of this book was liked by many individuals. There are multiple different messages and post on Facebook or in Excel in MS ...