Monday, October 13, 2014

How to create drop down menu in MS Excel?

Hi All, The central and state governments were well prepared for the yesterday's cyclone Hudhud. And by God's grace we had very little casualties in comparison to last years Phailin. RIP for those who couldn't make it.

I was completely out of "Excel in MS Excel" and was fully occupied from last 6 months on my office work. This really paid me high on satisfaction. I have won two deals this financial year. Still two more to come. Finger crossed though!!!

Have got some time again to write for you all. I would like to share with you that in Excel we can create a drop down menu by using the "Data Validation" tools available under the Data ribbon.

Step 1: Create the list of items which you would like to put in the "Drop Down" list.

Step 2: Click "Data Validation" in the Data Ribbon and then select "List" from the drop down. This will pop out a "Data Validation" dialog box. In this you have to locate the list of items in the Source cell which you would like to bring in the drop down menu.
And that's it!! You have drop down menu in the selected cell. Now which ever item from the list you want you can select.

This feature helps you a lot when you want to choose an item from different options. If you allow users to populate the same, there may not be any uniqueness on that. And further it will be difficult for you to apply selections etc.


For more information on how to do this, please get in touch with me at Samrat.biswaas@gmail.com 

Friends, Now Excel in MS Excel is available in Facebook as well. You can quickly raise your MS Excel related queries in its platform. I will try to resolve them.

Visit Other MS Excel Tips and Tricks

Samrat Biswas, Six Sigma (Green Belt), MOS Excel Expert 2013, ITIL 2011 Foundation
Advanced MS Office (Excel, Word, PowerPoint, One Note, Outlook), and MS Visio
---------------------------------------------------------------------------------------------------------
Be a part of regular Weekend Knowledge Sharing Sessions
Reach me @ +91 8095039316/ +91 8095039315

Wednesday, April 16, 2014

How to create workspace in MS Excel and its benefits?

cómo crear un espacio de trabajo en MS Excel y sus beneficios?

Let’s consider that in your day to day activities on reporting you need to open multiple excel spreadsheets available in different locations to compile data at one report file. So every day while starting, you need to take the pain of opening these files from different location and then start your work.

To avoid the repetition of opening multiple files from multiple location; you can create a workspace file (*.xlw) and save it at a known location. So every day when you open this file you will get all your desired files opened at one place and at the same position where you want them to be available for your report creation.

To create the workspace file you need to open all your files and keep them in the way you want to get this open every day. Go to the View tab. There you click “Save Workspace” option. This will provide you the dialog box of saving the *.xlw file at your desired location.

Post that whenever you want to open these files together you can directly click the *.xlw file and this will allow you to get all the spreadsheets which you want to open to accomplish your work.

For more information on how to do this, please get in touch with me at Samrat.biswaas@gmail.com.

Friends, Now Excel in MS Excel is available in Facebook as well. You can quickly raise your MS Excel related queries in its platform. I will try to resolve them.

Visit Other MS Excel Tips and Tricks


Samrat Biswas, Six Sigma (Green Belt), MOS Excel Expert 2013, ITIL 2011 Foundation
Advanced MS Office (Excel, Word, PowerPoint, One Note, Outlook), and MS Visio
---------------------------------------------------------------------------------------------------------
Be a part of regular Weekend Knowledge Sharing Sessions
Reach me @ +91 8095039316/ +91 8095039315
https://www.facebook.com/Samrat.Biswas

Monday, March 24, 2014

How to insert Calendar Control in MS Excel?

Cómo insertar Control Calendar en MS Excel?
Spanish Version of this blog

To insert the calendar control you first have to enable your "Developer" tab. For this click "Excel Option" and check the "Show Developer tab in the Ribbon" option.

Step 1: Go to the "Developer Tab" and click "Insert" control drop down. There you will get "Form Controls" and "ActiveX Controls"

Step 2: In the ActiveX Controls, click the more control option. By doing this you will get the following dialog box.
Step 3: Select "Calendar Control 12.0" and click OK.

Step 4: Drag your cursor on the spreadsheet where you want to keep the calendar. You will get the calendar control as shown below.

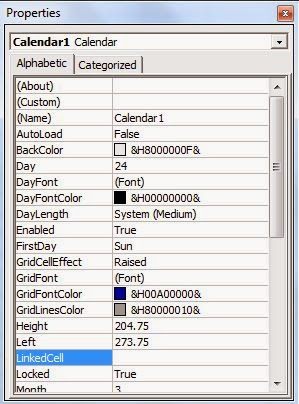
Step 5: Select the Calendar and click right. Select the "Properties" option and go to the "LinkedCell" and type the cell number where you want to display the selected date from your calendar.


And there you go..your Calendar Control is successfully inserted. Now you can pick any date from the shown calendar and your date will be visible in the particular cell.

For more information on how to do this, please get in touch with me at Samrat.biswaas@gmail.com.

Friends, Now Excel in MS Excel is available in Facebook as well. You can quickly raise your MS Excel related queries in its platform. I will try to resolve them.

Visit Other MS Excel Tips and Tricks
How to recover unsaved files in MS Excel 2013?
What are Sparklines in MS Excel?

Samrat Biswas, Six Sigma (Green Belt), MOS Excel Expert 2013, ITIL 2011 Foundation
Advanced MS Office (Excel, Word, PowerPoint, One Note, Outlook), and MS Visio 
---------------------------------------------------------------------------------------------------------
Be a part of regular Weekend Knowledge Sharing Sessions
Reach me @ +91 8095039316/ +91 8095039315
https://www.facebook.com/Samrat.Biswas

Sunday, March 16, 2014

How to move texts from Notepad to Column in MS Excel?

This is also known as "Import a Delimited Text File".

Step 1: To import a Delimited Text File, the user has to go to the “DATA” ribbon. In this there is a tool named “Get External Data”. By the help of this tool user can import data from Access, Web or from Text files. The text file has to be delimited.
MS Excel 2013 - Data Ribbon
Step 2: Click “From Text” Option. An Import Text File dialog box will pop in. Locate the delimited file you want to import in excel. Click “Import”.

Post clicking “Import”, you will get a “Text Import Wizard”. It has 3 steps involved in it. Check My Data as headers and click Next.

Click the Delimiters available in your file. In the shown example it is “Tab” delimiter. Then click Next. This will lead to you Step 2 of 3.
Now you have to identify if the data available in the text file is differentiated by Tab or Semicolon or Comma, Space or Others. Pick the right option and click Next. This will lead to you Step 3 of 3.
Step 2 of this Import Wizard provides you option to select each column and set the Data Format. It has and Advanced option as well to convert numeric values to numbers etc. Once done click Finish.

This will lead to another pop up dialog box of "Import Data". This option allows user to view the data in following format:-
  1. Table
  2. Pivot Table Report
  3. Pivot Chart etc.
It also asks where do you want to put the data say which Cell on the existing worksheet or New Worksheet. Locate the cell from where you want the data to come in. Your available data in Delimited Text file will get imported in excel.

For more information on how to do this, please get in touch with me at Samrat.biswaas@gmail.com

Friends, Now Excel in MS Excel is available in Facebook as well. You can quickly raise your MS Excel related queries in its platform. I will try to resolve them.

Visit Other MS Excel Tips and Tricks
How to avoid #DIV/0! and #Value! Error?
How to create One Variable Data Table using What-if-Analysis?


Samrat Biswas, Six Sigma (Green Belt), MOS Excel Expert 2013, ITIL 2011 Foundation
Advanced MS Office (Excel, Word, PowerPoint, One Note, Outlook), and MS Visio 
---------------------------------------------------------------------------------------------------------
Be a part of regular Weekend Knowledge Sharing Sessions
Reach me @ +91 8095039316/ +91 8095039315
https://www.facebook.com/Samrat.Biswas

Wednesday, January 22, 2014

About Pivot Table. How to Activate the Auto Refresh Option of Pivot Table?

First of all I would like to wish you all a Happy and Prosperous New Year, 2014. I got a bit late in wishing this as I was occupied in the joining and training formalities in my new organization, Capgemini.

Let's again proceed to know more on MS Excel. I would like to share some information on Pivot table today. Pivot table is an interactive table that automatically extracts, organizes, and summarizes your data. We can use this to analyze the data, make comparisons, detect patterns and relationships, and discover trends.

You might have observed that every time you have to refresh your Pivot table post updating your master data from where you have created a Pivot table. To avoid this repetation, MS Excel has an option which helps the user to Refresh the data every time you open the file.This forces the Pivot table to refresh it automatically while opening.

To perform this, select the pivot table and click right. Click "PivotTable Options" and visit the "Data" tab as shown below. There you will find the check box option of "Refresh data when opening file".

Check the box and save. For more information on how to do this, please get in touch with me at Samrat.biswaas@gmail.com

Friends, Now Excel in MS Excel is available in Facebook as well. You can quickly raise your MS Excel related queries in its platform. I will try to resolve them.

Visit Other MS Excel Tips and TricksHow to avoid #DIV/0! and #Value! Error?
How to create One Variable Data Table using What-if-Analysis?


Desde el analisis de blogspot, yo encontre que aqui son mas nacionales de espanol visita en mi Excel in MS Excel blog. so soy escribo el blogs en espanol tambien desde proximo blog en adelante. Espero el nacionales de espanol visitarnos en mi blog le gustara este in espanol.
Samrat Biswas, Six Sigma (Green Belt), MOS Excel Expert 2013, ITIL 2011 Foundation
Advanced MS Office (Excel, Word, PowerPoint, One Note, Outlook), and MS Visio
--------------------------------------------------------------------------------------------------------------------
Be a part of regular Weekend Knowledge Sharing Sessions
Reach me @ +91 8095039316/ +91 8095039315
https://www.facebook.com/Samrat.Biswas

Monday, December 23, 2013

What is Flash Fills in Excel 2013? How to turn it on?


Sometime we have to fill lot of repetitive data in excel and that becomes very cumbersome. During such cases Flash Fills newly included in MS Excel 2013 helps and saves a lot of time and effort. There are two different options available to reduce time and effort by avoiding repetitive tasks. 1) Auto Fill and 2) Flash Fill.

Auto Fill: Instead of entering data manually on a worksheet, you can use the Auto Fill feature to fill cells with data that follows a pattern or that is based on data in other cells.

Flash Fill: Use Flash Fill, new in Excel 2013, to fill out data based on an example. Flash Fill typically starts working when it recognizes a pattern in your data, and works best when your data has some consistency.

How to turn on Flash Fills?

Flash Fill is On by default. However if it is not working then visit File => Option and then click Advanced. You will get the option of Flash Fill as shown below.

Check the box and save. For more information on how to do this, please get in touch with me at Samrat.biswaas@gmail.com

Friends, Now Excel in MS Excel is available in Facebook as well. You can quickly raise your MS Excel related queries in its platform. I will try to resolve them. And finally Merry Christmas to All.


Visit Other MS Excel Tips and Tricks
How to avoid #DIV/0! and #Value! Error?
How to create One Variable Data Table using What-if-Analysis?

Samrat Biswas, Six Sigma (Green Belt), MOS Excel Expert 2013, ITIL 2011 Foundation
Advanced MS Office (Excel, Word, PowerPoint, One Note, Outlook), and MS Visio
--------------------------------------------------------------------------------------------------------------------
Be a part of regular Weekend Knowledge Sharing Sessions
Reach me @ +91 8095039316/ +91 8095039315
https://www.facebook.com/Samrat.Biswas

Monday, December 16, 2013

How to create Custom Dates?

While I was appearing the MOS exam for Excel expert, I got a question of changing the date format to only year i.e., YYYY. Do you know how to do this?

If you go to the Format Cell option and then Date; you will not get this option of changing your date to YYYY.

To convert this into the desired format, first you have to select the cell where you have the date (MM-DD-YYYY) and then click Format Cell Option either by doing right click or by Number Format settings. Refer as shown below.


Click Date in the Number tab. You will get all the different date formats in Type:. Check thoroughly, you will not get the date format of YYYY.

For this, after clicking date you have to click "Custom" as shown beside. And here you go with the option of editing the date in the Type: cell. Select the format and update it to YYYY.

For more information on how to do this, please get in touch with me at Samrat.biswaas@gmail.com

Friends, Now Excel in MS Excel is available in Facebook as well. You can quickly raise your MS Excel related queries in its platform. I will try to resolve them.

Visit Other MS Excel Tips and Tricks
How to protect your workbook and prevent unauthorized access with a password?
Know more on HOME Ribbon!!

Discussions on LinkedIn.
http://www.linkedin.com/groupAnswers?viewQuestionAndAnswers=&discussionID=5818291548428713984&gid=44008&commentID=5819332919608512512&trk=view_disc&fromEmail=&ut=17jI2SoaCMS601

http://www.linkedin.com/groupAnswers?viewQuestionAndAnswers=&discussionID=5818291549154332673&gid=1838429&commentID=5819278410286915584&trk=view_disc&fromEmail=&ut=2BT0iQEH2NS601

Samrat Biswas, Six Sigma (Green Belt), MOS Excel Expert 2013, ITIL 2011 Foundation
Advanced MS Office (Excel, Word, PowerPoint, One Note, Outlook), and MS Visio
--------------------------------------------------------------------------------------------------------------------
Be a part of regular Weekend Knowledge Sharing Sessions
Reach me @ +91 8095039316/ +91 8095039315
https://www.facebook.com/Samrat.Biswas

Preface 2nd Edition

The Kindle edition of this book was liked by many individuals. There are multiple different messages and post on Facebook or in Excel in MS ...